Saturday, May 4, 2013

Great Cakes Soapworks Last Soap Challenge - Leopard Spots

Well here it is. I have been super busy at my day job and haven't had a chance to post my last entry into Amy's Soap Challenge from Great Cakes Soapworks.

This didn't go as I thought it would and I don't think I will try this again. Too messy!!! lol

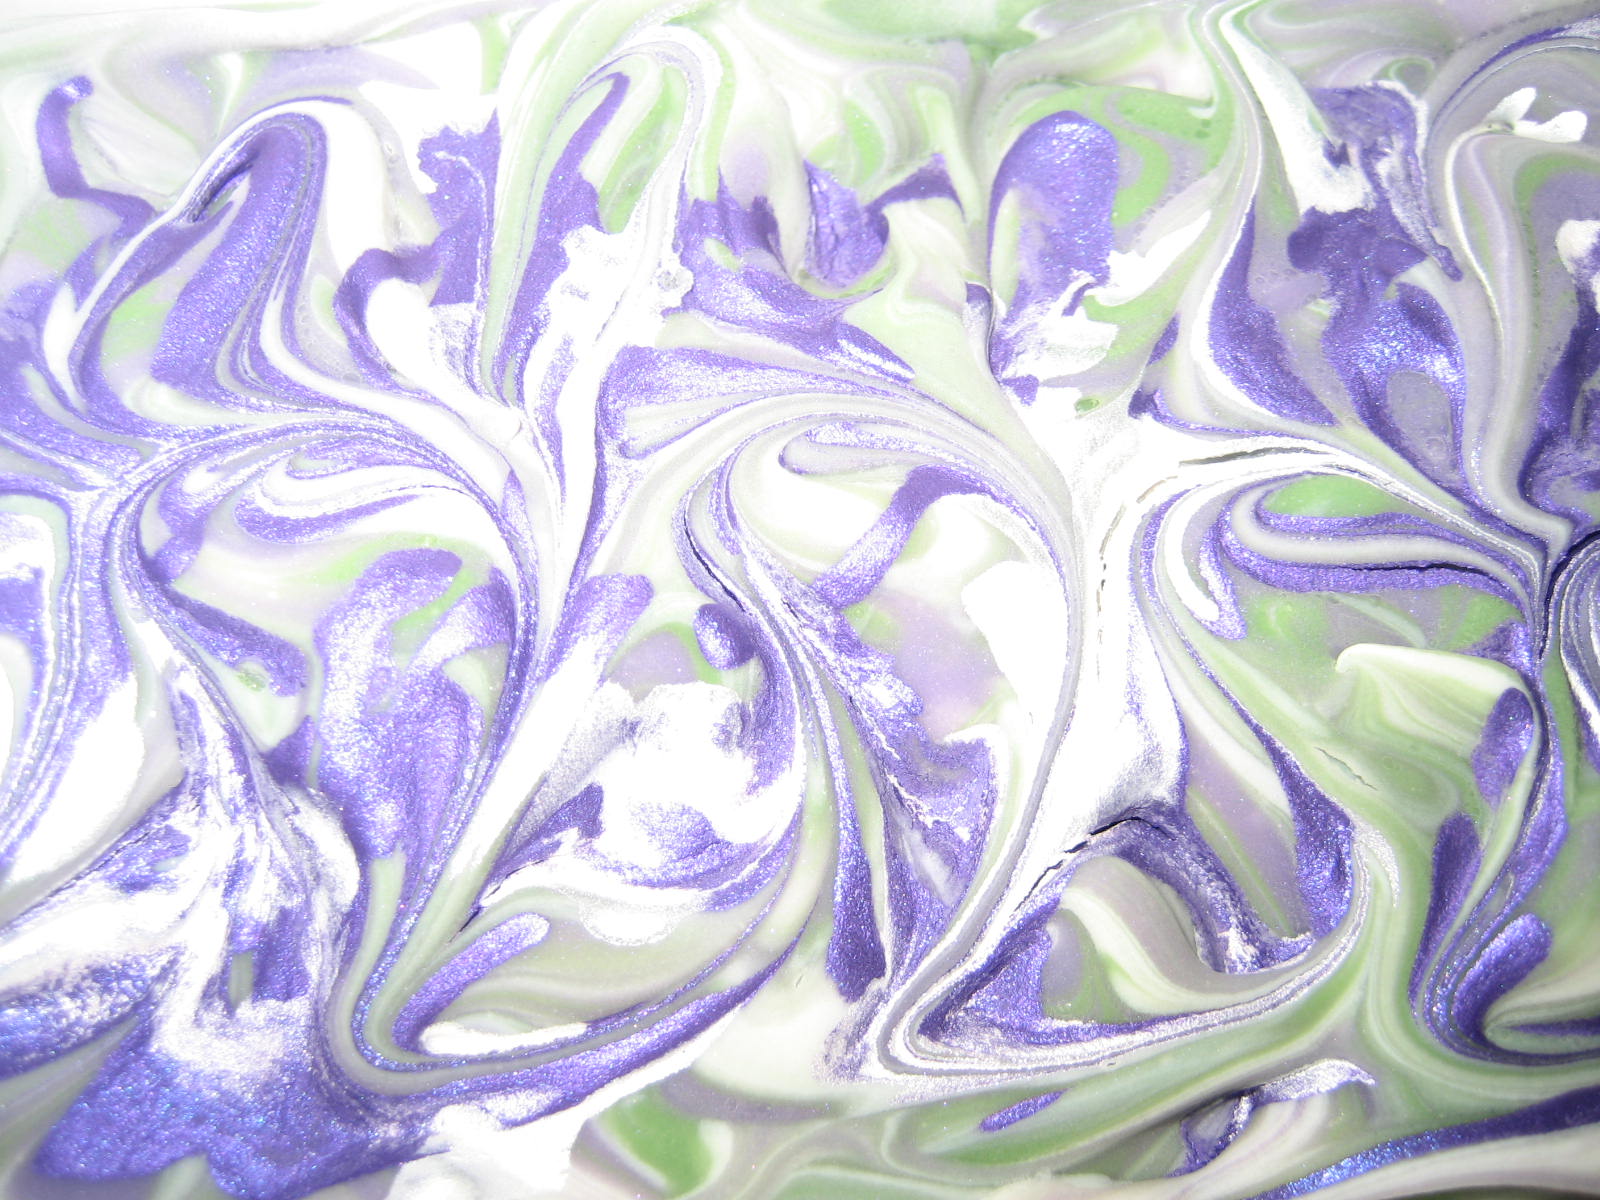
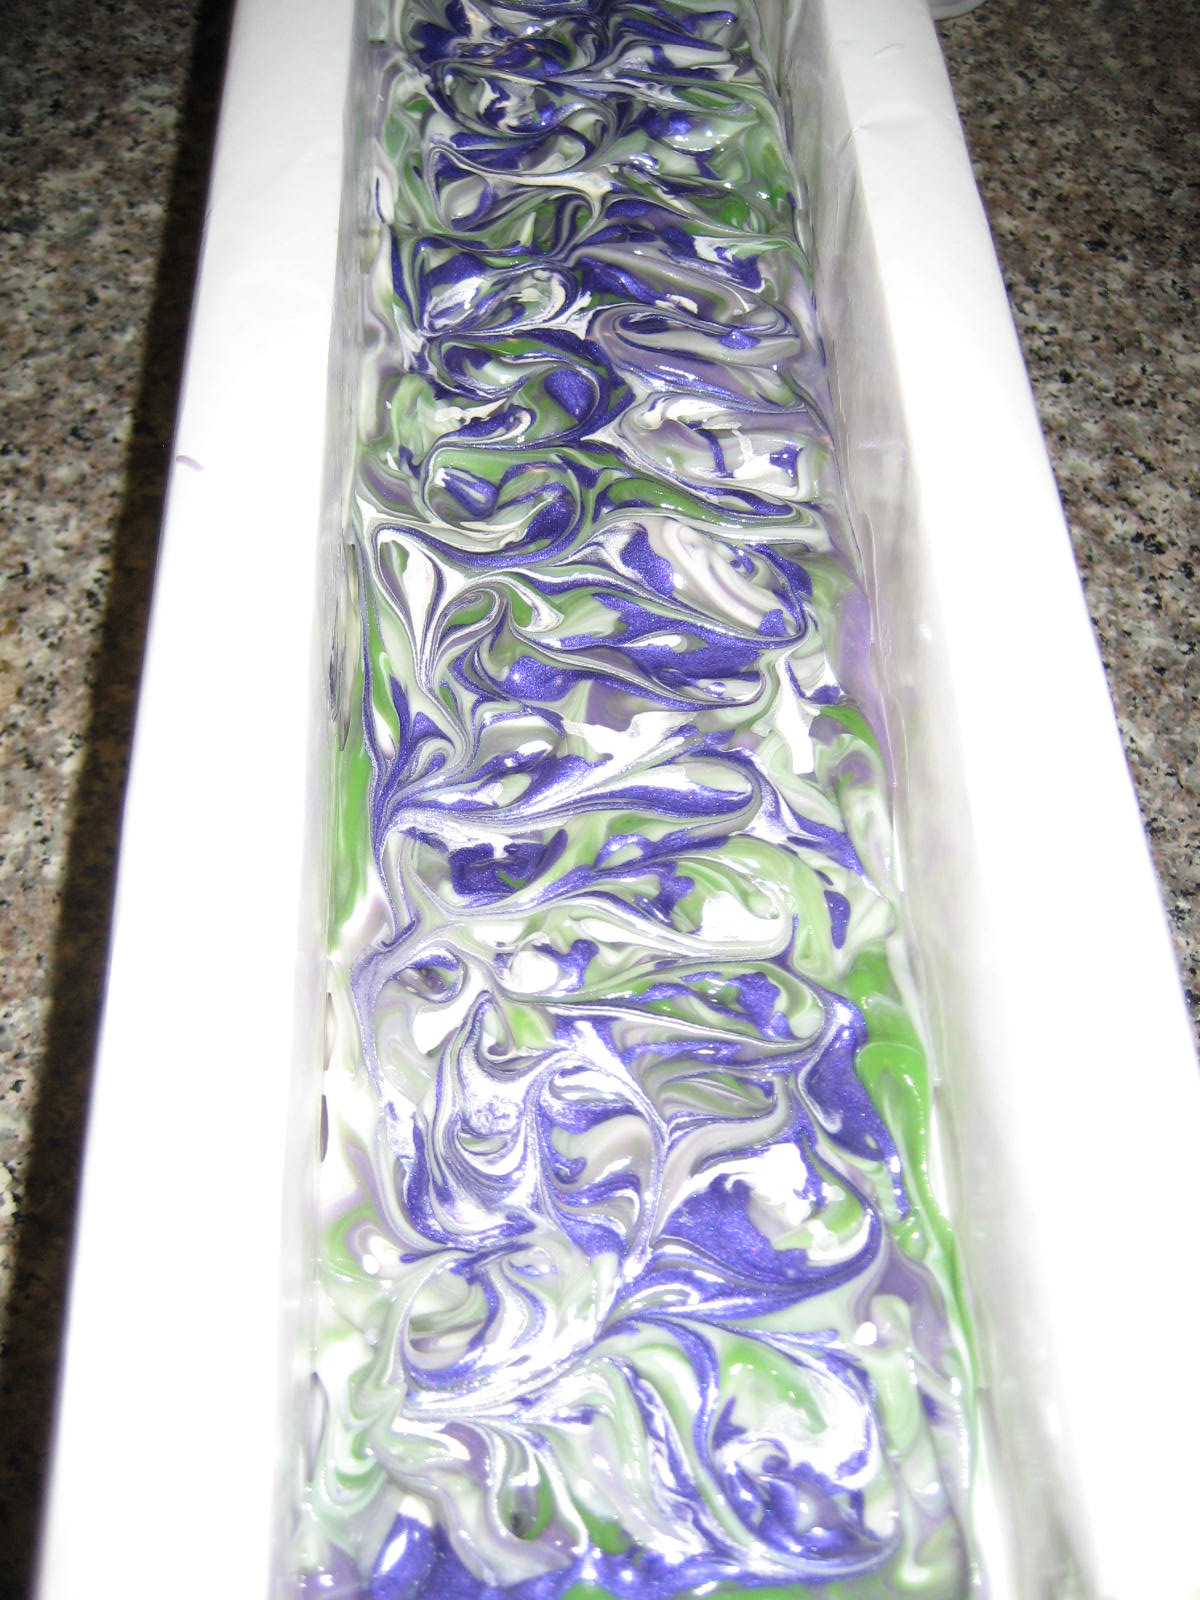
I had a couple of issues and one of the issues I didn't know I had until I cut into the soap. First problem was how thick I let the batter get. It wasn't as thick as I would let it go if I were making cupcakes or something that needed to be stiff but it didn't quite do what I wanted it to do. As you can see my leopard spots look more like flowers. But it's still pretty.

After I finished putting it all together I let it sit for 3 days before I cut it because I was just too busy to get to it. It unmolded just fine so I made my first cut. To my surprise the leopard spots were very soft and squishy but the rest of the soap was normal. It almost just flowed out like it was melted. Very very strange. So I didn't continue cutting and let it sit for another couple of days. During this time I went over my notes and decided that the premixed black oxide I used from Natures Garden was the culprit. It is mixed with an oil and because I only colored about a cup of batter it was enough to superfat the black too much. I am hoping the oils will absorb or cure out. It cut much better today but the spots are still really soft. 

Now I know that I am supposed to account for the extra oil in my calculations. But since I only used a tiny amount and it was impossible to have just the black a bit more lye heavy than the other parts without actually making the soap separate I didn't think it would cause such a fuss. Another lesson learned. I used water with my TD and put the blue mica in the soap batter dry. I will not use these premixed colorants on tiny portions again. I'm glad I found out now before I used the premixed colorants I have for my 4th of July soap. 

Anywho... this is the last challenge and I have learned some good lessons again. I look forward to the next round.

Thank you so much Amy for making us step out of our comfort zones and to learn something new. Hugs to you my friend :)


Monday, April 22, 2013

Happy Birthday to Me!! :)


Yes... it is my birthday today!! Yay!!

How old am I? 
Well if you know your cars then you will know I am the same age as this beautiful, in my dreams if I win the lottery,  Ford Mustang Shelby G.T. 350
If you're not such a car buff you can find a clue on the car ;)


So, did I make birthday soap? Yes I did, thank you for asking... lol
I will post pictures this weekend, if I figure out how to use the new camera my husband bought me. If not, you will see pictures made from my phone :p

Update: I did get the camera but haven't quite figured out how to use it properly so here are my phone photo shots of Birthday Soap!!


Sunday, April 14, 2013

Wedding Favor Soaps... Almost done!

This is what I have so far for the wedding. I hope it isn't tacky that I am making different soap styles but in the same colors. I originally wanted to make them all the same but how boring .. right? 
Better check in with the bride before it's too late.. lol


Want a peek at part of my soap area? I have more in boxes!!


Saturday, April 13, 2013

Great Cakes Soapworks Challenge #3.. Mica Oils

Hello folks... This is Challenge #3 at Amy's Great Cakes Soapworks... Mica Oils. If you have missed out on the challenge you can check it out here.


My son and his fiance are getting married next month and I took the opportunity to kill two birds with one stone, so to speak. I am making soap for wedding favors and since I have to make a batch for the challenge I might as well use the colors for the wedding.
I have made several batches of soap already and decided early on that I didn't want all the soaps to be the same style but definitely the same colors. So I am working with purple, green and white. 
I have made layers, and faux funnel, and a plop kind of technique so this time I thought I would make an in the pot swirl. I wish I had the foresight to have my camera near while I am soaping to give you all better pictures but I am always afraid I will drop it in my soap batter or get raw soap on my camera. So, the only pictures I have for you are in the mold foe now and cut later.

I had no issues to report on this batch, yet. Everything went as planned. I used the same Bastille recipe (olive oil, coconut oil and castor oil) that I have been using for most of my challenges. I really like the simpleness of it and I truly like the soap afterwards too. I used sodium lactate in my last 2 batches and so far so good. 

I had somebody ask me when and how I add my additives and what temp do I soap, etc. Well, I measure and weigh everything in separate containers. I mix up my lye and water first so that can be cooling off while I get everything else ready. I poured a small amount of water out into a small cup before I added the lye so I can use the water to disperse my titanium dioxide. Next, if I am using my wooden mold I line it and put it aside so it is ready too. Then I melt the coconut oil and add that and my castor oil to the olive oil and give it a quick buzz with my stick blender. Then I pour off a small amount of my oil to mix my colors in and put that aside. 
While my oils and lye are dropping to room temp I prepare the colors. I mixed about 1 heaping tsp of the purple cosmo mica in the reserved oil in a small cup. If I were using a dry colorant for the green I would do the same for that one. But I have a premixed green oxide that I used this time. I then added 2 heaping tsp of TD to the water in the cup that I reserved. I also mixed a tsp each of purple cosmo and super pearly white in a bit of sweet almond oil to drizzle on top. 

Once my lye mixture and oils are room temp (77 F today) I then add my FO to the oils in the big pot and give it a quick blend with my stick blender so everything is incorporated. I add the sodium lactate to the lye mixture and give it a stir and then add the lye mix to my oils. I alternate stick blending and stirring with a spoon until I know it is all incorporated. It took several minutes to get it to a very light trace. I then poured off some batter into 2 measuring/mixing cups for my colors. Then I added the water/TD mixture to the large portion still in the bucket. Once I know that is well mixed with my stick blender I mix up the other colors the same way. 
Now that all my soap batter is colored the way I want it to I pour back the green and purple into the white to do an in the pot swirl. I save a bit of the colored soap to add to the top. The trick to this technique is to not have your soap too thin that it makes mud but not too thick that it doesn't pour or mix easily. 
So then I I just pour it into my mold and let it do it's own swirling. I drizzle the remainder of the purple and green and make a bit of texture on top so the mica oil has some peaks and valleys to ooze around on. Once I have dripped the mica oils the way I want I do a little swirly with a skewer and that's it. 
Put it to bed until tomorrow :)

The FO I used in this batch is called Mardi Gras from Natures Garden. It's very nice and it soaps like a dream. Natures Garden is one of my favorite places to buy FO. They test all of them before they sell them to us and they post the findings on their website. If it changes colors, rices, accelerates, or seizes they will tell you. If the scent morphs or fades, they will also tell you.

Ok... so on to some pictures :)


My choice of mica colors were Cosmo Martini Mica from The Conservatorie and Super Pearly White from Brambleberry. I also used cosmo martini in the soap as well as a premixed green oxide that I got from Natures Garden and TD from Brambleberry.


To be continued....

Next day... ready to cut :)


Sunday, April 7, 2013

Not so "failed" soap.. hmmm

In my last post I mentioned my test batch that cracked all over the top when I used a red oxide. I took it out of the mold and left it on my soap rack and didn't cut it. I assumed that it would crack and fall apart like the top seemed to be doing so I was going to save it to rebatch later.
Well I got curious and cut the end off. To my wonder and surprise the inside was very pretty. For what ever reason the top was the only thing that was crumbly and cracked. The inside was normal. I test the ph and it was normal too. So I cut the tops off and here is what I got...


So, it seems that my "fail" wasn't such a waste after all :)

Wednesday, April 3, 2013

Amy's Soap Challenge Week #2 - Elemental

Ok folks.. this is week 2 of Amy's Soap Challenge. If you are just now hearing about it you can check it out at Amy's Great Cakes Soapworks blog here.

This challenge was really a challenge for me. I wasn't feeling particularly creative this week and nothing was coming to mind for me to do. I went on Pinterest and looked at color combos and swatches. I stared at the color wheel at least a dozen times and nothing was jumping out at me. Oh, don't get me wrong, I found lots of beautiful pictures and I could imagine them in soap, just not soap made by my hand. I am limited on my expertise on mixing colors. And, I've either had bad luck (oxides) or haven't experimented enough to be confident in the end result of my recreations of said beautiful photos (note to self, experiment more with my colorants and take better notes). I am much more confident in using micas but my inventory at the moment is mostly pop type micas. Very bright! I love bright colors so that is probably why I have more experience coloring with these micas. A couple of bad experiences with oxides and I have been avoiding them ever since.

Once I finally decided on the theme and colors I dug into my colorants. I knew I had more than a couple dozen to choose from.  I laid it all out and decided I was gong to have to try the oxides again if I wanted to have warmer colors. So I mixed up a small batch and colored it with some brick red oxide and some dark yellow oxide. Everything seemed like it was going well. I used a basic bastille recipe and a FO that I knew wouldn't act up. Mixed it all up and put it in the mold and put it to bed. The next day it was all cracked on top and still very soft. The softness wasn't a surprise since I was using a high amount of soft oils. But the cracking was a mystery. I soaped at room temperature. I checked the temp several times during soaping and while it was in the mold. It never went above 100 F. So I squished down the cracks and all it did was crack some more. I let it sit for another day and it was still very soft. I put it in the freezer for a bit so I could get it out of the mold to see what was going on. It's very very odd. The oxide parts of the soap seem to not want to stick together and the uncolored parts were fine. Again the oxides are causing me issue. Back to the drawing board...

The next couple of days were rough because I ended up going back to every reference or tutorial on how to use oxides and I did everything the right way. I premixed the oxides in a bit of a light carrier oil (sweet almond) and added it a little at a time till I got the color I wanted. I used a soap recipe that I am familiar with and a FO that doesn't cause issue. Next I think, "omgosh! maybe my scale is off!". I get out a handful of coins and check and recheck. The scale is fine. My lye and oils are neither new or old. For the life of me I can not figure out what went wrong except oxides hate me! lol

Ok, to make my long story a bit shorter, I decide to use the micas and venture off in uncharted territory. MIXING COLORS!! I needed to tone down the bright colors. I added some brown to the yellow. I added some black to the blue. Some ruby to the orange (that didn't work out so well... lol). But you get the picture.
I then set out to make my soap. I got a new blender while I was doing all this fiddling around. It has 2 speeds and I am really really loving it!! But I digress. I pulled out my big 4 lb mold for this challenge. I was gonna go big or go home!

Everything went as planned with no issues. Now I'm just sitting like a kid on Christmas Eve waiting to open my present. I'm probably going to leave it in there for a couple days so I will probably cut it on Friday or Saturday.

Here are a couple of teaser pics until then ;)


Here it is.... tada!! Not to shabby. The colors are a lot lighter than I wanted but I can live with it. I meant to put some texture in the soap before I added the mica line but I remembered after I added the mica and didn't want to mess it up. This was my inspiration picture and my cut soap!


Wednesday, March 27, 2013

Week one of Amy's Soap Challenge 2013 - Tiger Stripe

This is the first week of this years soap challenge being hosted by Amy at Great Cakes Soapworks. The challenge is to do a tiger swirl or method. It didn't look too complicated. Just had to figure out what colors to use and make time to try it out.

First I chose a Bastille recipe to soap with. I figured the high olive oil content would give me lots of time to play. I then chose a fragrance that, in the past, behaved well. I picked Coconut Lime Verbena. Then I chose the colors. I decided on yellow and black. I have never soaped with black and didn't get much feedback on how much to use in order to get a nice black soap without having too much black bubbles. I decided to just wing it and hope for the best. I had black mica and activated charcoal to choose from in my supplies. I chose mica.

I measured all my ingredients and melted my oils. I measured 1 tsp of yellow oxide into one container and 1 tsp of black mica into another. I added a bit of my melted oils to each and used my frother to mix them really good. I then added my FO to my oils. When my lye was about 108 F and my oils were 105 F, I poured my lye mixture into the oils and gave it a quick stick blend. I stirred it for a bit and gave it a couple more bursts. When I was sure it was just emulsified I split the batter into each of the containers with the colors. I noticed that my soap batter was accelerating!! OH NO!! I grabbed my wisk and mixed the colors and soap batter and it was getting thicker and thicker. I started pouring. I had to stir before each pour because it was pretty thick. So I just kept on going. Stirring, pouring and slamming my mold on the counter until the mold was full. I added gold mica oil to the top and added a bit of texture and put it to bed. Not sure how it's going to look but I am hoping for the best. I think the black is going bleed and give black bubbles :(

Here is a picture of it in the mold...


I think I played with the top too much and made a little bit of a muddy mess but it still looks pretty. I am a little disappointed in the FO. It was a new bottle but it was from the same supplier that I had used before without issue. It's the only thing I can think of that would of caused it to thicken up so fast. My recipe was almost 75% olive oil. I used 33% water instead of 38% but it's more than my usual 29%. I didn't get soap on a stick but it was thicker than I had planned on. Maybe it will be ok.

Ta da!! Here it is. I think it came out pretty good.. what do you think?

Oh.. and regarding the black and colored bubbles. Yup it makes colored bubbles. Kind of a greenish light gray color. Not too bad. Maybe it will lessen when it cures more. Or maybe it will get worse... not sure... hmmm.


Thank you Amy for putting on this challenge again. I'm so excited for the next one :)